July 2, 2022

Pear with numbers

Pear with Numbers Drawing 

Hello Guys , Today we are going to be drawing a Pear with numbers !
Things we need = Marker , Colour pencils or crayons page .
So let’s get started !

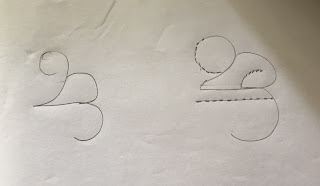
Step 1 :-  First , draw two circles like an eight vertically .
Step 2 :-  Second , draw two circles like an eight but this time horizontal .
Step 3 :- Third , draw a neat border like a pear shown in the picture .
Step 4 :-   Fourth , Erase the eights we have drawn and you get the base of the pear .
Step 5 :-  Fifth , Draw the leaves and stem of the pear and after outline with marker and colour it .

And we are done with the drawing , So we hope you like it !
Thank you and Goodbye!


June 30, 2022

How To Draw Polar Bear


Polar Bear ๐Ÿป‍❄️

Hello , today we are going to draw a polar bear 

Thing we need = Pencil , Page , Sharpener and Eraser .

So let’s get started  !

Step 1 :-  First , Draw a oval and small circle inside the Oval .

Step 2 :-  Second , Draw the eye , nose and ear if the Polar Bear .

Step 3 :-  Third , Draw the legs of the polar bear .

Step 4 :-  Fourth , Colour the picture .

And we are done with the drawing so , Hope you guys like it !

Thank you and Have A Great Day !


June 25, 2022

How to draw Squirrel Drawing

 ๐Ÿฟ Squirrel

Hello Guys !

Today we are going to be drawing a Squirrel !

Things we need = Pencil , Pens , colour pencils or crayons ๐Ÿ– and paper .

So let’s get started !

Step 1 : First , Take any size paper and draw a Two and a three combined .

Step 2 : Second , next Erase the top part of the two and complete and the head of the squirrel .

Step 3 : Third , then the draw details if the squirrel heads like eyes and mouth .

Step 4 : Fourth , draw some branches for the squirrel to be on .

Step 5 : Fifth , draw some leaves , outline it and colour it .

And we are done with this number drawing , We hope you like it !

Thank you and Goodbye !


June 23, 2022

Lotus Temple


Hello guys !

Today we are going to be drawing The lotus temple in New Delhi !

Things we need = Pencil , Pens , colour pencils or crayons and markers .

So let’s get started !

How to draw the building :

Step 1 : First , draw a path to the building .

Step 2 : Second , draw a half of a circle where ever you stopped your path .

Step 3 : Third , after you are done with that draw two quadrants face ti the half circle . 

Step 4 : Fourth , then draw bunny ears on top of the entrance . 

Step 5 : Fifth , then connect the 2 quadrants and 2 bunny ears by drawing a sideways bird .

Step 6 : Sixth , draw the excess.

How to colour the picture : 

Step 1 : First , take your art equipment and take pencil or a gray crayon and colour the building .

Step 2 : Second , take the colour green and colour the ground and the trees .

Step 3 : Third , after you are done with that colour the sky blue and sun yellow , orange and red . 

And we are done with the craft , We hope you like it !

Thank you and Have a Good Day !

May 11, 2022

Parrot and Humming Bird Drawing ✍️

 Hello Guys , Welcome back ! Today we will be drawing a bird ( Kookaburra and Humming Bird )

Things we need for both drawings = Colour pencils or oil pastels , Colour paper ,  paper and black marker.

How to draw the Kookaburra :

Step 1 : First , take a page and draw some branches and a tree for the bird to sit on .

Step 2 : Second , take your paintbrush and dip it in green paint and paint leaves with the paintbrush .

Step 3 :Third , Now draw bird sitting on the tree with the tail sticking out of the tree .

Step 4 : Fourth , Now colour in the drawing with colourful colours .

How to draw the background of the drawing :

Things we need = Colour Paper 

Step 1 : First , take green or yellow colour paper and trace many leaves on the page .

Step 2 : Second , Cut and glue the pieces onto the drawing .

And we are done with the drawing , So we hope you like it !

Thank you Goodbye !


April 29, 2022

Single Peacock Sketches


Hello Guys !

Today we are going to be drawing a Peacock !

Things we need = Pencil , Pens , colour pencils or crayons ๐Ÿ– and paper . 

So let’s get started !

Step 1 : First , Take A Blank Sheet and draw a Three Cured lines to draw the body of the peacock. 

Step 2 : Second , next draw a beak and eyes and details of the peacock’s face.

Step 3 : Third , then draw draws many small circles beside the peacock’s body to draw a wings.

Step 4 : Fourth , draw many lines from the body to the end of the page.

Step 5 : Fifth , draw a circle and a smaller circle inside that will be a coconut-shaped circle , and draw many of these on the page.

Step 6 : Sixth , Outline the drawing and then colour the ✍️ drawing.

And we are done with this drawing , We hope you like it !

Thank you and Goodbye !


April 5, 2022

How To Draw Owl In A Very Easy Way (number drawing)

Owl

Hello Guys !

Today we are going to be drawing a Owl !

Things we need = Pencil , Pens , colour pencils or crayons ๐Ÿ– and paper .

So let’s get started !

Step 1 : First , Take any size paper and draw a Two twos (one small and one big).

Step 2 : Second , next draw the body and the head of the owl.

Step 3 : Third , then draw some wiggle on the face and the legs of the owl.

Step 4 : Fourth , draw the details of the face like eyes and beak ,also draw the wings.

Step 5 : Fifth , outline it and colour it and if want also draw a background .

And we are done with this number drawing , We hope you like it !

Thank you and Goodbye !


Today we are going to be drawing a Owl !

Things we need = Pencil , Pens , colour pencils or crayons ๐Ÿ– and paper .

So let’s get started !

Step 1 : First , Take any size paper and draw a Two twos (one small and one big).

Step 2 : Second , next draw the body and the head of the owl.

Step 3 : Third , then draw some wiggle on the face and the legs of the owl.

Step 4 : Fourth , draw the details of the face like eyes and beak ,also draw the wings.

Step 5 : Fifth , outline it and colour it and if want also draw a background .

And we are done with this number drawing , We hope you like it !

Thank you and Goodbye ! Today we are going to be drawing a Owl !

Things we need = Pencil , Pens , colour pencils or crayons ๐Ÿ– and paper .

So let’s get started !

Step 1 : First , Take any size paper and draw a Two twos (one small and one big).

Step 2 : Second , next draw the body and the head of the owl.

Step 3 : Third , then draw some wiggle on the face and the legs of the owl.

Step 4 : Fourth , draw the details of the face like eyes and beak ,also draw the wings.

Step 5 : Fifth , outline it and colour it and if want also draw a background .

And we are done with this number drawing , We hope you like it !

Thank you and Goodbye !


March 22, 2022

Heart shape Ideas

 Heart Shapes Using Waste Paper: A Creative and Eco-Friendly Craft Idea

If you're looking for a fun and eco-friendly way to add some handmade charm to your decor, creating heart shapes using waste paper is a perfect project! Not only does it allow you to reuse paper that would otherwise be discarded, but it also lets you make something beautiful and unique. In this tutorial, I'll show you how to make various heart shapes using paper scraps and basic materials you probably already have at home.

Materials You’ll Need

  • Waste paper (newspaper, old magazines, or any scrap paper)
  • Scissors
  • Glue (white glue or glue stick)
  • Pencil and eraser
  • A sturdy backing (like cardboard or thick paper) for mounting
  • Optional: Paint or markers if you want to add color

How to Make Different Heart Shapes with Waste Paper

1. Rolled Paper Heart

  • Step 1: Tear or cut your paper into small strips, around 1-2 cm wide and 4-6 inches long.
  • Step 2: Take a strip and start rolling it tightly from one end to form a small spiral or coil.
  • Step 3: Glue the end of the strip to secure the roll.
  • Step 4: Repeat this process to make several paper rolls.
  • Step 5: Arrange the rolls on a piece of cardboard in the shape of a heart. Use larger rolls on the outer edges and smaller ones in the center for dimension.
  • Step 6: Once you’re satisfied with the arrangement, glue each roll in place.
  • Step 7: Let it dry, and you have a beautifully textured heart!

2. Torn Paper Collage Heart

  • Step 1: Tear your waste paper into small pieces.
  • Step 2: Draw a heart shape on cardboard or thick paper.
  • Step 3: Apply glue within the heart outline and start sticking the torn paper pieces inside the shape. You can layer the pieces or use different colors of paper for a textured, collage effect.
  • Step 4: Once the heart is filled, let it dry. You can add a clear coat of glue or Mod Podge on top to make it glossy.

3. Folded Origami Paper Heart

  • Step 1: Cut your scrap paper into squares, around 3x3 inches.
  • Step 2: Follow simple origami steps to fold each square into a heart shape.
    • Start with a square piece of paper and fold it diagonally in both directions.
    • Unfold the paper, and bring the top corner down to the center.
    • Fold the bottom up to create the bottom point of the heart, and then shape the sides.
  • Step 3: You can make several of these origami hearts and arrange them on a backing in the shape of a larger heart or use them as small decorative pieces.

4. Layered Heart Silhouette

  • Step 1: Cut several hearts of different sizes from scrap paper, each slightly smaller than the last.
  • Step 2: Stack the hearts on top of each other, from largest to smallest.
  • Step 3: Glue each heart layer down, slightly offset if you want a 3D layered effect.
  • Step 4: Once dry, you can add extra decorations like glitter or small doodles.

Tips for Making Your Paper Hearts

  • Experiment with Textures: Use different types of paper, like magazine pages, newspapers, or cardstock, for a unique look.
  • Add Color: Paint your paper rolls or torn pieces before assembling for a colorful heart.
  • Seal for Durability: If you want your heart to last longer, brush a thin layer of glue or Mod Podge over the final product.

March 15, 2022

Number Drawings


๐Ÿฟ Squirrel

Hello Guys !

Today we are going to be drawing a Squirrel !

Things we need = Pencil , Pens , colour pencils or crayons ๐Ÿ– and paper .

So let’s get started !

Step 1 : First , Take any size paper and draw a Two and a three combined .

Step 2 : Second , next Erase the top part of the two and complete and the head of the squirrel .

Step 3 : Third , then the draw details if the squirrel heads like eyes and mouth .

Step 4 : Fourth , draw some branches for the squirrel to be on .

Step 5 : Fifth , draw some leaves , outline it and colour it .

And we are done with this number drawing , We hope you like it !

Thank you and Goodbye !


๐Ÿฆ‰ Owl

Hello Guys !

Today we are going to be drawing a Owl !

Things we need = Pencil , Pens , colour pencils or crayons ๐Ÿ– and paper .

So let’s get started !

Step 1 : First , Take any size paper and draw a Two twos (one small and one big).

Step 2 : Second , next draw the body and the head of the owl.

Step 3 : Third , then draw some wiggle on the face and the legs of the owl.

Step 4 : Fourth , draw the details of the face like eyes and beak ,also draw the wings.

Step 5 : Fifth , outline it and colour it and if want also draw a background .

And we are done with this number drawing , We hope you like it !

Thank You and Goodbye !


February 2, 2022

Homemade Calendar & Time Table

Hello Guys !

Today we are going to be making two homemade calendars !

Things we need = Pencil , Pens , colour pencils or crayons ๐Ÿ– ,paper , ruler and glue .

So let’s get started !

Step 1 : First , Take any size paper and draw a line which should be folded near the middle .

Step 2 : Second , next wherever you have done the line put the line towards you then make two more lines facing towards the big line .

Step 3 : Third , then fold them behind the small page and glue them to the back after you a type of holder make three more of them .

Step 4 : Fourth , If you want you can decorate the three holders by putting characters by using glue.

Step 5 : Fifth , take a A4 sheet any colour and make two lines by the length of the paper and fold it then glue one side and stick it the other line to make the base.

Step 6 : Sixth , after that stick the 3 holders onto the base.

And we are done with this calendar , We hope you like it !

Thank you and Goodbye !

School TIMETABLE 


January 22, 2022

Mother’s Day wishes

 Mother’s Day wishes 

Hello and Welcome to this site !

Today we are back with a small cute girl girl giving her mother roses .

About Mothers :

Mother is the name for God in the lips and hearts of little children.” “When you look into your mother’s eyes, you know that is the purest love you can find on this earth.” “A mother is she who can take the place of all others but whose place no one else can take.” … “The best place to cry is on a mother’s arms.”

Things we need : Some color pens or color pencils , pencil , plan white page or book .

Let’s get started !

Step 1:First , Draw the hair of the girl Next , Draw the face , dress , roses, stems , hands, ribbons , shoes, legs .

Step 2: Second, Color the dress Yellow and skirt also .

Step 3: Color the face , legs and hands skin colour .

Step 4:Color the hair with pancil black and a bit of shading on the hair .

Step 5: Color the roses and stems red and green color .it .