Things we need = colour pencils , pencil , markers , page.
So let’s get started !

Welcome to my Blog friends ,I write about Drawings And Craft Making Ideas and being a full-time creator You find different tips and tutorials ,Drawings for kids. Is a source of Home Decorating ideas.

Hello , today we are going to draw a polar bear
Thing we need = Pencil , Page , Sharpener and Eraser .
So let’s get started !
Step 1 :- First , Draw a oval and small circle inside the Oval .
Step 2 :- Second , Draw the eye , nose and ear if the Polar Bear .
Step 3 :- Third , Draw the legs of the polar bear .
Step 4 :- Fourth , Colour the picture .
And we are done with the drawing so , Hope you guys like it !
Thank you and Have A Great Day !
๐ฟ Squirrel
Hello Guys !
Today we are going to be drawing a Squirrel !
Things we need = Pencil , Pens , colour pencils or crayons and paper .
So let’s get started !
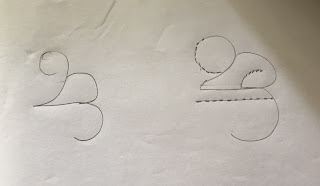
Step 1 : First , Take any size paper and draw a Two and a three combined .
Step 2 : Second , next Erase the top part of the two and complete and the head of the squirrel .
Step 3 : Third , then the draw details if the squirrel heads like eyes and mouth .
Step 4 : Fourth , draw some branches for the squirrel to be on .
Step 5 : Fifth , draw some leaves , outline it and colour it .
And we are done with this number drawing , We hope you like it !
Thank you and Goodbye !
Hello guys !
Today we are going to be drawing The lotus temple in New Delhi !
Things we need = Pencil , Pens , colour pencils or crayons and markers .
So let’s get started !
How to draw the building :
Step 1 : First , draw a path to the building .
Step 2 : Second , draw a half of a circle where ever you stopped your path .
Step 3 : Third , after you are done with that draw two quadrants face ti the half circle .
Step 4 : Fourth , then draw bunny ears on top of the entrance .
Step 5 : Fifth , then connect the 2 quadrants and 2 bunny ears by drawing a sideways bird .
Step 6 : Sixth , draw the excess.
How to colour the picture :
Step 1 : First , take your art equipment and take pencil or a gray crayon and colour the building .
Step 2 : Second , take the colour green and colour the ground and the trees .
Step 3 : Third , after you are done with that colour the sky blue and sun yellow , orange and red .
And we are done with the craft , We hope you like it !
Thank you and Have a Good Day !
Hello Guys , Welcome back ! Today we will be drawing a bird ( Kookaburra and Humming Bird )
Things we need for both drawings = Colour pencils or oil pastels , Colour paper , paper and black marker.
How to draw the Kookaburra :
Step 1 : First , take a page and draw some branches and a tree for the bird to sit on .
Step 2 : Second , take your paintbrush and dip it in green paint and paint leaves with the paintbrush .
Step 3 :Third , Now draw bird sitting on the tree with the tail sticking out of the tree .
Step 4 : Fourth , Now colour in the drawing with colourful colours .
How to draw the background of the drawing :
Things we need = Colour Paper
Step 1 : First , take green or yellow colour paper and trace many leaves on the page .
Step 2 : Second , Cut and glue the pieces onto the drawing .
And we are done with the drawing , So we hope you like it !
Thank you Goodbye !
Hello Guys !
Today we are going to be drawing a Peacock !
Things we need = Pencil , Pens , colour pencils or crayons ๐ and paper .
So let’s get started !
Step 1 : First , Take A Blank Sheet and draw a Three Cured lines to draw the body of the peacock.
Step 2 : Second , next draw a beak and eyes and details of the peacock’s face.
Step 3 : Third , then draw draws many small circles beside the peacock’s body to draw a wings.
Step 4 : Fourth , draw many lines from the body to the end of the page.
Step 5 : Fifth , draw a circle and a smaller circle inside that will be a coconut-shaped circle , and draw many of these on the page.
Step 6 : Sixth , Outline the drawing and then colour the ✍️ drawing.
And we are done with this drawing , We hope you like it !
Thank you and Goodbye !
Owl
Hello Guys !
Today we are going to be drawing a Owl !
Things we need = Pencil , Pens , colour pencils or crayons ๐ and paper .
So let’s get started !
Step 1 : First , Take any size paper and draw a Two twos (one small and one big).
Step 2 : Second , next draw the body and the head of the owl.
Step 3 : Third , then draw some wiggle on the face and the legs of the owl.
Step 4 : Fourth , draw the details of the face like eyes and beak ,also draw the wings.
Step 5 : Fifth , outline it and colour it and if want also draw a background .
And we are done with this number drawing , We hope you like it !
Thank you and Goodbye !
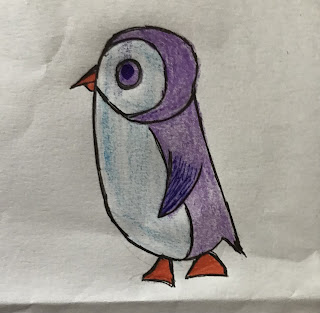
Today we are going to be drawing a Owl !
Things we need = Pencil , Pens , colour pencils or crayons ๐ and paper .
So let’s get started !
Step 1 : First , Take any size paper and draw a Two twos (one small and one big).
Step 2 : Second , next draw the body and the head of the owl.
Step 3 : Third , then draw some wiggle on the face and the legs of the owl.
Step 4 : Fourth , draw the details of the face like eyes and beak ,also draw the wings.
Step 5 : Fifth , outline it and colour it and if want also draw a background .
And we are done with this number drawing , We hope you like it !
Thank you and Goodbye ! Today we are going to be drawing a Owl !
Things we need = Pencil , Pens , colour pencils or crayons ๐ and paper .
So let’s get started !
Step 1 : First , Take any size paper and draw a Two twos (one small and one big).
Step 2 : Second , next draw the body and the head of the owl.
Step 3 : Third , then draw some wiggle on the face and the legs of the owl.
Step 4 : Fourth , draw the details of the face like eyes and beak ,also draw the wings.
Step 5 : Fifth , outline it and colour it and if want also draw a background .
And we are done with this number drawing , We hope you like it !
Thank you and Goodbye !
Heart Shapes Using Waste Paper: A Creative and Eco-Friendly Craft Idea
If you're looking for a fun and eco-friendly way to add some handmade charm to your decor, creating heart shapes using waste paper is a perfect project! Not only does it allow you to reuse paper that would otherwise be discarded, but it also lets you make something beautiful and unique. In this tutorial, I'll show you how to make various heart shapes using paper scraps and basic materials you probably already have at home.
Hello Guys !
Today we are going to be drawing a Squirrel !
Things we need = Pencil , Pens , colour pencils or crayons ๐ and paper .
So let’s get started !
Step 1 : First , Take any size paper and draw a Two and a three combined .
Step 2 : Second , next Erase the top part of the two and complete and the head of the squirrel .
Step 3 : Third , then the draw details if the squirrel heads like eyes and mouth .
Step 4 : Fourth , draw some branches for the squirrel to be on .
Step 5 : Fifth , draw some leaves , outline it and colour it .
And we are done with this number drawing , We hope you like it !
Thank you and Goodbye !
Hello Guys !
Today we are going to be drawing a Owl !
Things we need = Pencil , Pens , colour pencils or crayons ๐ and paper .
So let’s get started !
Step 1 : First , Take any size paper and draw a Two twos (one small and one big).
Step 2 : Second , next draw the body and the head of the owl.
Step 3 : Third , then draw some wiggle on the face and the legs of the owl.
Step 4 : Fourth , draw the details of the face like eyes and beak ,also draw the wings.
Step 5 : Fifth , outline it and colour it and if want also draw a background .
And we are done with this number drawing , We hope you like it !
Thank You and Goodbye !
Hello Guys !
Today we are going to be making two homemade calendars !
Things we need = Pencil , Pens , colour pencils or crayons ๐ ,paper , ruler and glue .
So let’s get started !
Step 1 : First , Take any size paper and draw a line which should be folded near the middle .
Step 2 : Second , next wherever you have done the line put the line towards you then make two more lines facing towards the big line .
Step 3 : Third , then fold them behind the small page and glue them to the back after you a type of holder make three more of them .
Step 4 : Fourth , If you want you can decorate the three holders by putting characters by using glue.
Step 5 : Fifth , take a A4 sheet any colour and make two lines by the length of the paper and fold it then glue one side and stick it the other line to make the base.
Step 6 : Sixth , after that stick the 3 holders onto the base.
And we are done with this calendar , We hope you like it !
Thank you and Goodbye !
School TIMETABLE