Monday, October 14, 2024

Diwali Greeting Cards


How to Make a Diwali Greeting Card

Diwali, the festival of lights, is a wonderful time to share joy and love with friends and family. One of the best ways to do this is by creating a handmade Diwali greeting card. A personalized card adds a special touch to your wishes and shows the effort you’ve put in. In this post, we'll guide you through making your own Diwali greeting card, step by step. 

Materials You'll Need:

  • Cardstock or thick paper (preferably in bright colors like red, orange, or yellow)
  • Colored markers or pens
  • Glitter glue
  • Stickers or embellishments (optional)
  • Scissors
  • Glue stick
  • Ruler
  • Pencil

Step 1: Choose a Card Design

Decide on the size and design of your greeting card. You can make a simple folded card by cutting an A4-size sheet of cardstock in half and folding it. This size is easy to handle and provides enough space for your decorations and message.

Step 2: Create the Background

Decorate the front of the card with a background pattern that reflects the spirit of Diwali. You can draw rangoli patterns, fireworks, or diya (oil lamp) designs using colored markers. If you’re not confident in your drawing skills, you can also use decorative paper or stickers to create a festive background.

Step 3: Add a Diya Design

Diwali is all about lights, so adding a diya or candle to your card is a must. Draw a simple diya outline on the front of the card using a pencil, then fill it in with bright colors like gold, yellow, or red. To make it shine, outline the diya with glitter glue and let it dry completely.

Step 4: Write a Festive Message

Write a heartfelt message inside your card. Some popular Diwali greetings include:

  • "Wishing you a Diwali full of joy, light, and prosperity!"
  • "May your Diwali be filled with love, light, and happiness."
  • "Sending you warm wishes for a bright and prosperous Diwali."

Use your colored markers to write the message in your best handwriting. You can also use calligraphy pens if you want to give it a more artistic touch.

Step 5: Add Embellishments

Add some finishing touches to your card by using embellishments like stickers, sequins, or small jewels. These decorations will make your card sparkle and give it that extra festive feel. Stick them around your diya design or in the corners of your card to enhance the overall look.

Step 6: Personalize It

A handmade card is special because of the personal touch you add to it. Write a personalized note to the recipient expressing your wishes for the festival. Let them know why they are important to you and how much you appreciate them.

Step 7: Envelope Decoration

Don’t forget to decorate the envelope! You can add a small diya or rangoli design on the front of the envelope to match the card. This little detail will make your greeting even more special.

Tips for Making a Great Diwali Card:

  • Use vibrant colors: Diwali is a festival of colors, so choose bright and cheerful shades for your card.
  • Be creative with patterns: Traditional Indian patterns like paisleys or mandalas work beautifully for a Diwali theme.
  • Keep it simple: Sometimes, a simple design with a heartfelt message is more impactful than a heavily decorated card.
  • Let it dry: Make sure all the glue and glitter are completely dry before folding or closing the card to avoid smudging.

Conclusion

Creating a handmade Diwali greeting card is a wonderful way to share your love and joy with friends and family. It’s a thoughtful gesture that adds a personal touch to your festive wishes. With these simple steps and a bit of creativity, you can make a beautiful card that your loved ones will cherish. Happy crafting and have a joyous Diwali!

Wednesday, October 9, 2024

Frog Easy Drawing

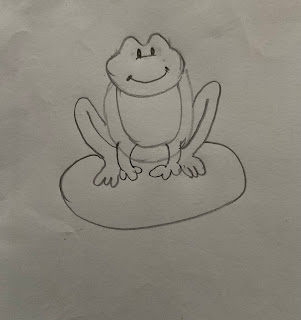
 Here’s a sample blog post for teaching kids and beginners how to draw a simple frog step by step:


How to Draw a Simple Frog in 5 Easy Steps

If you’re looking for a fun and easy way to improve your drawing skills, why not start with a frog? Frogs are cute, fun to draw, and can be created in just a few simple steps. Follow along with this guide to learn how to draw a frog that will sit proudly on your page!

Step 1: Draw the Frog's Body

Start by drawing an oval shape in the middle of your paper. This will form the frog’s body. You can make the oval as big or small as you like depending on the size of your frog.

Step 2: Add the Head

Next, draw a slightly smaller oval on top of the body, but more circular. This will be the frog's head. You can make the top of the head a little flat to give it a more natural look.

Step 3: Draw the Legs

For the front legs, draw two simple curved lines on each side of the body, leading down to the front of the frog. Add small ovals at the end of each leg for the frog's feet. Don’t forget to include a few toes! Repeat this step with larger curved lines and ovals for the back legs, but make them appear like they are bent and resting on the ground.

Step 4: Create the Face

Now for the fun part—give your frog a face! Draw two small circles at the top of the head for the eyes, and place a dot in each for the pupils. Add a big, happy smile in the middle of the face. You can make your frog look however you want by adjusting the size of the eyes and mouth.

Step 5: Add Details

To complete your frog, draw a little platform or rock under its feet (like in the picture above). You can also add details like spots on the frog’s body, a pond in the background, or even a few water lilies around it!


Tips for Drawing Your Frog:

  • Don’t worry about making your lines perfect; frogs can be a little bumpy and uneven.
  • Use light pencil strokes at first so that you can easily erase mistakes.
  • Feel free to color your frog afterward! You can make it a traditional green, or get creative with bright colors.

Now, it's your turn! Grab your pencil and give this easy frog drawing a try. With a little practice, you’ll have a perfect amphibian friend hopping across your paper in no time!


Saturday, October 5, 2024

Emma's World

 How to Draw a Cute Character Like Emma: A Step-by-Step Guide

If you love creating charming characters with big eyes and adorable expressions, this step-by-step guide will show you how to draw your own character, just like "Emma." Emma’s sweet style, complete with a hat, bag, and warm expression, makes her the perfect character to practice your drawing skills on. Let's dive in!

Step 1: Sketch the Face Shape

Start by lightly sketching a circle for Emma's face. Make sure to leave enough space for her large, expressive eyes. Below the circle, sketch a small chin to give her face a more defined shape. Draw guidelines down the middle and horizontally across the face to help with placing her features.

Step 2: Add the Big Eyes

The signature feature of Emma’s style is her big, round eyes. Draw two large ovals on either side of the face’s center guideline. Inside each eye, draw smaller circles for the pupils, and leave a little white space for highlights to give her eyes a lively look. You can fill in the pupils with black to make the eyes pop!

Step 3: Draw the Hair and Hat

Emma’s hairstyle is long, flowing, and soft. Start by sketching the outline of her hair, which frames her face with gentle waves. Draw the large hat sitting on top of her head—begin with a wide, curved brim and a round top. You can add a small flower detail to the side of her hat for extra cuteness.

Step 4: Add Facial Features and Expression

Now it’s time to give Emma her warm expression. Draw a small nose just below the eye line and a sweet, smiling mouth beneath it. You can also add subtle blush marks on her cheeks by shading lightly or using color. Her eyebrows should be small and soft to maintain her kind look.

Step 5: Draw the Outfit

Emma is wearing a cute dress and a small crossbody bag. Start by drawing the outline of her dress—a simple, flowing design with short sleeves. Don’t forget to draw the bag's strap going across her body, and add details to the bag, like the little bear face on the front! You can add extra detail by drawing folds in her dress to give it texture.

Step 6: Add Finishing Touches

Once the main sketch is done, go over your lines with a darker pen or marker to make the drawing stand out. If you'd like, you can also color in the drawing! In the drawing of Emma, her hat is a soft yellow, her dress is green with blue overalls, and her hair is a lovely shade of light brown. Feel free to get creative with your colors!

Step 7: Background and Lettering

In this drawing, "Emma" is written boldly at the top in a stylish font. You can write the name of your character in any font you like—play around with block letters, cursive, or bubble letters to match your character's personality. Add small hearts, stars, or any other decorations around the drawing for a whimsical feel!


Tips for Drawing Cute Characters:

  • The bigger the eyes, the cuter your character will look!
  • Use soft, rounded shapes for features like the nose and mouth to give a kind expression.
  • Add small details like flowers, bows, or patterns to make your character stand out.
  • Don’t worry if your first attempt isn’t perfect—practice makes progress!

Drawing characters like Emma is a fun way to bring your imagination to life. Whether you’re creating your own original character or drawing a beloved figure like Emma, have fun with the process and make the character uniquely yours. Happy drawing!


Gojo Drawings


How to Draw Satoru Gojo from Jujutsu Kaisen: A Step-by-Step Guide

Satoru Gojo from Jujutsu Kaisen is one of the most popular and recognizable characters in anime today. Known for his powerful abilities and cool demeanor, Gojo also has a distinct appearance with his spiky white hair and signature black blindfold or glasses. If you're a fan of the series and want to learn how to draw Gojo, you’re in the right place!

In this step-by-step guide, we’ll show you how to draw a simplified version of Gojo based on the image you uploaded. With a little patience and practice, you'll be able to capture his iconic look.


Materials You'll Need:

  • Drawing paper
  • Pencil
  • Eraser
  • Black pen or fine marker (optional, for outlining)
  • Ruler (optional, for straight lines)

Step 1: Start with the Face Outline

Begin by sketching a basic outline of Gojo's face. His face has a fairly typical anime shape: slightly pointed at the chin with soft, rounded edges for the cheeks and jawline. Draw a light vertical line down the center to help with the symmetry of the face.

  • The chin should be a bit sharper than a typical oval shape.
  • His head may seem slightly narrower due to his high collar.

Step 2: Draw the Eyes and Blindfold

Gojo’s signature look includes a black blindfold or glasses, so we'll focus on drawing that first. Since the blindfold covers his eyes, you only need to hint at his facial structure below it.

  • Lightly sketch horizontal lines where the blindfold will be, just above the center of the face. This gives a nice balance between the top of his head and the chin.
  • Draw the shape of the blindfold or glasses by extending two lines across the face. Notice that the blindfold curves slightly around the bridge of his nose.
  • After the basic shape is drawn, shade in the blindfold or draw in the details like the folds of the fabric if you’re aiming for a more detailed look.

Step 3: Sketch the Nose and Mouth

Because Gojo’s blindfold covers his eyes, your next focus will be on the lower part of his face.

  • Draw a small, simple nose just below the blindfold. Gojo’s nose should be subtle, with a tiny curve or small angled line, as anime characters often have minimal facial details.
  • For the mouth, Gojo typically has a relaxed, confident expression. Draw a slightly curved line to give him a faint smile, but keep it understated to reflect his laid-back personality.

Step 4: Add the Ears

On either side of his face, just below the level of the eyes or blindfold, draw his ears. His ears are relatively small and stick out just slightly from the sides of his head.

  • Be careful to keep the ears symmetrical and aligned horizontally.

Step 5: Draw Gojo’s Hair

Gojo's spiky hair is one of his defining features, and it gives him a distinct, wild look.

  • Start by drawing a series of jagged, angular lines around the top of his head to create the impression of spiky hair. The spikes should be uneven and irregular to give it a natural, messy look.
  • The spikes go in various directions but generally upward and outward. Make sure to extend some of the spikes beyond the top of the head for a dramatic effect.

Step 6: Draw the Collar and Neck

Gojo often wears a high-collared coat, and this is an essential part of his look.

  • From just below his chin, sketch out the large collar. The collar is fairly wide and rises up toward his cheeks, which partially hides his neck.
  • Use straight or slightly angled lines to give the collar a structured, defined look.
  • Add light shading to give the collar depth.

Step 7: Add Details and Final Touches

Now that you have the main structure of Gojo drawn, go over your pencil lines with a black pen or marker to make the drawing stand out.

  • You can choose to keep the lines simple and clean, or add extra details like shading around the neck, in the hair, or to the folds of the blindfold.
  • Lightly shade Gojo's hair to create depth, or leave it as simple line art for a more minimalist look.
  • Make sure to erase any unnecessary guidelines.

Pro Tips:

  • Hair: Gojo’s hair is spiky and wild, so don’t worry too much about making it look perfect. The more irregular the spikes, the better!
  • Blindfold: The blindfold adds mystery and a cool vibe to Gojo, so feel free to experiment with different styles of shading to bring it to life.
  • Expressions: Gojo often has a calm, confident look, so don’t make his smile too wide or exaggerated. Keep it subtle for a more accurate representation of his character.

Final Thoughts:

Drawing Satoru Gojo can be a fun way to practice sketching anime characters. His distinct features—like the blindfold, spiky hair, and confident expression—make him both a challenging and rewarding character to draw. With a little practice, you’ll be able to capture his essence perfectly.

Whether you’re a beginner or more experienced in anime drawing, this step-by-step guide should help you get started on creating your own Gojo masterpiece. Keep practicing, and have fun drawing one of the coolest characters in anime!