Tuesday, December 3, 2024

NewYear Wishes

 Celebrating Creativity: My "Happy New Year" Artwork

As the New Year approaches, I wanted to create something special to capture the spirit of renewal, hope, and joy that this season brings. Inspired by nature's vibrant beauty and the festive vibes of the holiday season, I decided to draw this cheerful "Happy New Year" card.

The Inspiration Behind the Design

Flowers symbolize growth, freshness, and positivity—values that align perfectly with the promise of a new beginning. I chose to incorporate blooming daisies into the artwork to represent the blossoming opportunities and aspirations that the New Year brings. The handwritten "Happy New Year" message adds a personal and heartfelt touch, making this piece feel warm and inviting.

My Creative Process

  1. Sketching the Layout: I started by outlining the floral arrangement and the central text. My goal was to balance the design so that the flowers framed the message beautifully.

  2. Adding Colors: I used a mix of pastel and bright tones to fill in the flowers and leaves, giving the piece a lively yet calming vibe. The yellows and greens in the background create a subtle contrast that makes the flowers pop.

  3. Details and Finishing Touches: Finally, I added shading and intricate details to the petals and leaves, giving the artwork depth and dimension. The lettering was carefully styled to complement the natural theme while conveying the festive cheer of the New Year.


Sharing the Joy

Creating this artwork was an incredibly fulfilling experience, and I hope it brings a smile to everyone who sees it. As we step into the New Year, I encourage you to find moments to create, reflect, and share your unique perspective with the world.

Let’s welcome the New Year with open hearts and a renewed sense of purpose. Wishing you all a happy and prosperous year ahead! ๐ŸŒธ✨

Monday, October 14, 2024

Diwali Greeting Cards


How to Make a Diwali Greeting Card

Diwali, the festival of lights, is a wonderful time to share joy and love with friends and family. One of the best ways to do this is by creating a handmade Diwali greeting card. A personalized card adds a special touch to your wishes and shows the effort you’ve put in. In this post, we'll guide you through making your own Diwali greeting card, step by step. 

Materials You'll Need:

  • Cardstock or thick paper (preferably in bright colors like red, orange, or yellow)
  • Colored markers or pens
  • Glitter glue
  • Stickers or embellishments (optional)
  • Scissors
  • Glue stick
  • Ruler
  • Pencil

Step 1: Choose a Card Design

Decide on the size and design of your greeting card. You can make a simple folded card by cutting an A4-size sheet of cardstock in half and folding it. This size is easy to handle and provides enough space for your decorations and message.

Step 2: Create the Background

Decorate the front of the card with a background pattern that reflects the spirit of Diwali. You can draw rangoli patterns, fireworks, or diya (oil lamp) designs using colored markers. If you’re not confident in your drawing skills, you can also use decorative paper or stickers to create a festive background.

Step 3: Add a Diya Design

Diwali is all about lights, so adding a diya or candle to your card is a must. Draw a simple diya outline on the front of the card using a pencil, then fill it in with bright colors like gold, yellow, or red. To make it shine, outline the diya with glitter glue and let it dry completely.

Step 4: Write a Festive Message

Write a heartfelt message inside your card. Some popular Diwali greetings include:

  • "Wishing you a Diwali full of joy, light, and prosperity!"
  • "May your Diwali be filled with love, light, and happiness."
  • "Sending you warm wishes for a bright and prosperous Diwali."

Use your colored markers to write the message in your best handwriting. You can also use calligraphy pens if you want to give it a more artistic touch.

Step 5: Add Embellishments

Add some finishing touches to your card by using embellishments like stickers, sequins, or small jewels. These decorations will make your card sparkle and give it that extra festive feel. Stick them around your diya design or in the corners of your card to enhance the overall look.

Step 6: Personalize It

A handmade card is special because of the personal touch you add to it. Write a personalized note to the recipient expressing your wishes for the festival. Let them know why they are important to you and how much you appreciate them.

Step 7: Envelope Decoration

Don’t forget to decorate the envelope! You can add a small diya or rangoli design on the front of the envelope to match the card. This little detail will make your greeting even more special.

Tips for Making a Great Diwali Card:

  • Use vibrant colors: Diwali is a festival of colors, so choose bright and cheerful shades for your card.
  • Be creative with patterns: Traditional Indian patterns like paisleys or mandalas work beautifully for a Diwali theme.
  • Keep it simple: Sometimes, a simple design with a heartfelt message is more impactful than a heavily decorated card.
  • Let it dry: Make sure all the glue and glitter are completely dry before folding or closing the card to avoid smudging.

Conclusion

Creating a handmade Diwali greeting card is a wonderful way to share your love and joy with friends and family. It’s a thoughtful gesture that adds a personal touch to your festive wishes. With these simple steps and a bit of creativity, you can make a beautiful card that your loved ones will cherish. Happy crafting and have a joyous Diwali!

Wednesday, October 9, 2024

Frog Easy Drawing

 Here’s a sample blog post for teaching kids and beginners how to draw a simple frog step by step:


How to Draw a Simple Frog in 5 Easy Steps

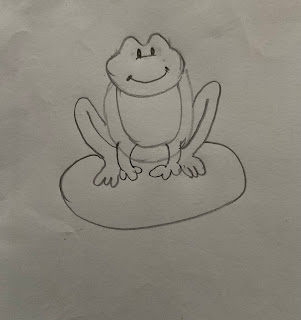
If you’re looking for a fun and easy way to improve your drawing skills, why not start with a frog? Frogs are cute, fun to draw, and can be created in just a few simple steps. Follow along with this guide to learn how to draw a frog that will sit proudly on your page!

Step 1: Draw the Frog's Body

Start by drawing an oval shape in the middle of your paper. This will form the frog’s body. You can make the oval as big or small as you like depending on the size of your frog.

Step 2: Add the Head

Next, draw a slightly smaller oval on top of the body, but more circular. This will be the frog's head. You can make the top of the head a little flat to give it a more natural look.

Step 3: Draw the Legs

For the front legs, draw two simple curved lines on each side of the body, leading down to the front of the frog. Add small ovals at the end of each leg for the frog's feet. Don’t forget to include a few toes! Repeat this step with larger curved lines and ovals for the back legs, but make them appear like they are bent and resting on the ground.

Step 4: Create the Face

Now for the fun part—give your frog a face! Draw two small circles at the top of the head for the eyes, and place a dot in each for the pupils. Add a big, happy smile in the middle of the face. You can make your frog look however you want by adjusting the size of the eyes and mouth.

Step 5: Add Details

To complete your frog, draw a little platform or rock under its feet (like in the picture above). You can also add details like spots on the frog’s body, a pond in the background, or even a few water lilies around it!


Tips for Drawing Your Frog:

  • Don’t worry about making your lines perfect; frogs can be a little bumpy and uneven.
  • Use light pencil strokes at first so that you can easily erase mistakes.
  • Feel free to color your frog afterward! You can make it a traditional green, or get creative with bright colors.

Now, it's your turn! Grab your pencil and give this easy frog drawing a try. With a little practice, you’ll have a perfect amphibian friend hopping across your paper in no time!


Saturday, October 5, 2024

Emma's World

 How to Draw a Cute Character Like Emma: A Step-by-Step Guide

If you love creating charming characters with big eyes and adorable expressions, this step-by-step guide will show you how to draw your own character, just like "Emma." Emma’s sweet style, complete with a hat, bag, and warm expression, makes her the perfect character to practice your drawing skills on. Let's dive in!

Step 1: Sketch the Face Shape

Start by lightly sketching a circle for Emma's face. Make sure to leave enough space for her large, expressive eyes. Below the circle, sketch a small chin to give her face a more defined shape. Draw guidelines down the middle and horizontally across the face to help with placing her features.

Step 2: Add the Big Eyes

The signature feature of Emma’s style is her big, round eyes. Draw two large ovals on either side of the face’s center guideline. Inside each eye, draw smaller circles for the pupils, and leave a little white space for highlights to give her eyes a lively look. You can fill in the pupils with black to make the eyes pop!

Step 3: Draw the Hair and Hat

Emma’s hairstyle is long, flowing, and soft. Start by sketching the outline of her hair, which frames her face with gentle waves. Draw the large hat sitting on top of her head—begin with a wide, curved brim and a round top. You can add a small flower detail to the side of her hat for extra cuteness.

Step 4: Add Facial Features and Expression

Now it’s time to give Emma her warm expression. Draw a small nose just below the eye line and a sweet, smiling mouth beneath it. You can also add subtle blush marks on her cheeks by shading lightly or using color. Her eyebrows should be small and soft to maintain her kind look.

Step 5: Draw the Outfit

Emma is wearing a cute dress and a small crossbody bag. Start by drawing the outline of her dress—a simple, flowing design with short sleeves. Don’t forget to draw the bag's strap going across her body, and add details to the bag, like the little bear face on the front! You can add extra detail by drawing folds in her dress to give it texture.

Step 6: Add Finishing Touches

Once the main sketch is done, go over your lines with a darker pen or marker to make the drawing stand out. If you'd like, you can also color in the drawing! In the drawing of Emma, her hat is a soft yellow, her dress is green with blue overalls, and her hair is a lovely shade of light brown. Feel free to get creative with your colors!

Step 7: Background and Lettering

In this drawing, "Emma" is written boldly at the top in a stylish font. You can write the name of your character in any font you like—play around with block letters, cursive, or bubble letters to match your character's personality. Add small hearts, stars, or any other decorations around the drawing for a whimsical feel!


Tips for Drawing Cute Characters:

  • The bigger the eyes, the cuter your character will look!
  • Use soft, rounded shapes for features like the nose and mouth to give a kind expression.
  • Add small details like flowers, bows, or patterns to make your character stand out.
  • Don’t worry if your first attempt isn’t perfect—practice makes progress!

Drawing characters like Emma is a fun way to bring your imagination to life. Whether you’re creating your own original character or drawing a beloved figure like Emma, have fun with the process and make the character uniquely yours. Happy drawing!


Gojo Drawings


How to Draw Satoru Gojo from Jujutsu Kaisen: A Step-by-Step Guide

Satoru Gojo from Jujutsu Kaisen is one of the most popular and recognizable characters in anime today. Known for his powerful abilities and cool demeanor, Gojo also has a distinct appearance with his spiky white hair and signature black blindfold or glasses. If you're a fan of the series and want to learn how to draw Gojo, you’re in the right place!

In this step-by-step guide, we’ll show you how to draw a simplified version of Gojo based on the image you uploaded. With a little patience and practice, you'll be able to capture his iconic look.


Materials You'll Need:

  • Drawing paper
  • Pencil
  • Eraser
  • Black pen or fine marker (optional, for outlining)
  • Ruler (optional, for straight lines)

Step 1: Start with the Face Outline

Begin by sketching a basic outline of Gojo's face. His face has a fairly typical anime shape: slightly pointed at the chin with soft, rounded edges for the cheeks and jawline. Draw a light vertical line down the center to help with the symmetry of the face.

  • The chin should be a bit sharper than a typical oval shape.
  • His head may seem slightly narrower due to his high collar.

Step 2: Draw the Eyes and Blindfold

Gojo’s signature look includes a black blindfold or glasses, so we'll focus on drawing that first. Since the blindfold covers his eyes, you only need to hint at his facial structure below it.

  • Lightly sketch horizontal lines where the blindfold will be, just above the center of the face. This gives a nice balance between the top of his head and the chin.
  • Draw the shape of the blindfold or glasses by extending two lines across the face. Notice that the blindfold curves slightly around the bridge of his nose.
  • After the basic shape is drawn, shade in the blindfold or draw in the details like the folds of the fabric if you’re aiming for a more detailed look.

Step 3: Sketch the Nose and Mouth

Because Gojo’s blindfold covers his eyes, your next focus will be on the lower part of his face.

  • Draw a small, simple nose just below the blindfold. Gojo’s nose should be subtle, with a tiny curve or small angled line, as anime characters often have minimal facial details.
  • For the mouth, Gojo typically has a relaxed, confident expression. Draw a slightly curved line to give him a faint smile, but keep it understated to reflect his laid-back personality.

Step 4: Add the Ears

On either side of his face, just below the level of the eyes or blindfold, draw his ears. His ears are relatively small and stick out just slightly from the sides of his head.

  • Be careful to keep the ears symmetrical and aligned horizontally.

Step 5: Draw Gojo’s Hair

Gojo's spiky hair is one of his defining features, and it gives him a distinct, wild look.

  • Start by drawing a series of jagged, angular lines around the top of his head to create the impression of spiky hair. The spikes should be uneven and irregular to give it a natural, messy look.
  • The spikes go in various directions but generally upward and outward. Make sure to extend some of the spikes beyond the top of the head for a dramatic effect.

Step 6: Draw the Collar and Neck

Gojo often wears a high-collared coat, and this is an essential part of his look.

  • From just below his chin, sketch out the large collar. The collar is fairly wide and rises up toward his cheeks, which partially hides his neck.
  • Use straight or slightly angled lines to give the collar a structured, defined look.
  • Add light shading to give the collar depth.

Step 7: Add Details and Final Touches

Now that you have the main structure of Gojo drawn, go over your pencil lines with a black pen or marker to make the drawing stand out.

  • You can choose to keep the lines simple and clean, or add extra details like shading around the neck, in the hair, or to the folds of the blindfold.
  • Lightly shade Gojo's hair to create depth, or leave it as simple line art for a more minimalist look.
  • Make sure to erase any unnecessary guidelines.

Pro Tips:

  • Hair: Gojo’s hair is spiky and wild, so don’t worry too much about making it look perfect. The more irregular the spikes, the better!
  • Blindfold: The blindfold adds mystery and a cool vibe to Gojo, so feel free to experiment with different styles of shading to bring it to life.
  • Expressions: Gojo often has a calm, confident look, so don’t make his smile too wide or exaggerated. Keep it subtle for a more accurate representation of his character.

Final Thoughts:

Drawing Satoru Gojo can be a fun way to practice sketching anime characters. His distinct features—like the blindfold, spiky hair, and confident expression—make him both a challenging and rewarding character to draw. With a little practice, you’ll be able to capture his essence perfectly.

Whether you’re a beginner or more experienced in anime drawing, this step-by-step guide should help you get started on creating your own Gojo masterpiece. Keep practicing, and have fun drawing one of the coolest characters in anime!


Friday, September 27, 2024

Wall Frame

 Creating Art with Color Paper and Chilli Stems: Flower Bouquet

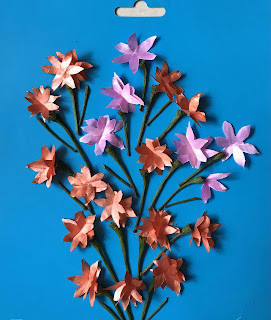
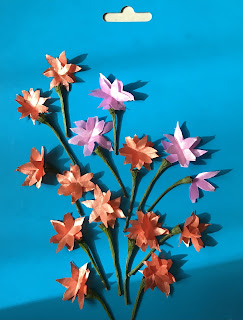
In a world where crafting meets sustainability, the possibilities for creativity are endless. Today, I want to share a simple yet beautiful project that showcases just how easy it is to repurpose everyday materials into something artistic and unique. Using color paper and dried chili stems, I made a bouquet of flowers that not only looks elegant but also embodies the spirit of upcycling.

Materials Used:

  1. Color Paper: Various shades of pink, purple, and red to bring the flowers to life.
  2. Chili Stems: The sturdy, dried stems of chilies serve as the perfect base for the flower stems.
  3. Glue & Scissors: Simple tools to cut and assemble the flowers.

How It Was Made:

  • Step 1: Cut the color paper into flower shapes. For this project, I used a mix of warm red-orange tones and cool lavender shades to give the bouquet a vibrant yet harmonious look.
  • Step 2: Fold and shape the cut paper pieces to give each flower some texture and dimension, making them look more natural.
  • Step 3: Attach the chili stems to the back of each paper flower. This not only provides a sturdy foundation but also adds a unique organic element to the project.
  • Step 4: Assemble the flowers by arranging them into a bouquet. The combination of varying flower sizes and colors creates a dynamic and eye-catching design.

Why I Love This Project:

  • Eco-Friendly: Repurposing chili stems that would otherwise go to waste adds a sustainable touch to this artwork. It’s a reminder that beauty can be found in the most unexpected materials.
  • Simple Yet Striking: The simplicity of using just color paper and natural stems contrasts with the complex beauty of the finished bouquet.
  • Creative Freedom: This project offers endless possibilities. You can experiment with different color combinations, shapes, and even other materials like dried twigs or leaves.

Final Thoughts:

Crafting with upcycled materials is not just about reducing waste; it's about seeing potential in everyday objects. With just a little creativity and some basic supplies, anyone can turn ordinary items into a work of art. This colorful flower bouquet made from paper and chili stems is a testament to that—simple, eco-friendly, and undeniably charming.

Why not give it a try yourself? Gather your leftover materials, unleash your creativity, and make something beautiful


Friday, August 30, 2024

Homemade Birthday Greeting Card

 Birthday Day Card

Nothing says "I care" quite like a handmade greeting card! Whether it's for a birthday, holiday, or just because, creating a card from scratch adds a personal touch that store-bought cards can't match. Plus, it’s fun and easy to do! Here's a simple guide to help you make your own homemade greeting card.

Materials You’ll Need:

  • Cardstock or Thick Paper: This will be the base of your card.
  • Colored Paper: To add layers, patterns, or shapes.
  • Scissors: For cutting shapes and paper.
  • Glue Stick or Double-Sided Tape: To stick your decorations in place.
  • Markers, Crayons, or Colored Pencils: For writing messages and adding designs.
  • Stickers, Ribbons, Buttons, or Glitter: Optional decorations to make your card extra special.

Step 1: Choose Your Card Base

Start by choosing the paper or cardstock that will be the base of your card. Fold it in half to create the card shape.  But feel free to experiment with different sizes!

Step 2: Plan Your Design

Think about the occasion and the message you want to send. Sketch a rough design on a scrap piece of paper. Do you want a simple, elegant card, or something more colorful and fun? You can go for a traditional look or something more creative—it's all up to you!

Step 3: Decorate the Front

Now, it’s time to bring your design to life! Cut out shapes from colored paper, like hearts, stars, or flowers, and glue them to the front of the card. You can also use stickers, draw patterns with markers, or add a bit of sparkle with glitter. If you want to add layers, glue some patterned paper or fabric as a background.

Step 4: Write Your Message

Inside the card, write your message with a pen, marker, or colored pencil. Keep it simple, or add a poem or favorite quote. If you're feeling creative, try writing in fancy handwriting or using calligraphy!

Step 5: Add Finishing Touches

Once your message is done, you can add any final touches. Maybe a ribbon tied in a bow on the front or some buttons to add dimension. Make sure everything is securely glued down, so your card looks neat and polished.

Step 6: Personalize It

The best part of a homemade card is how personal it is. Add your own flair with a signature doodle, a photo, or a hand-drawn border. Don’t forget to sign your name!

Step 7: Give with Love

Your homemade greeting card is now ready to share! Slip it into an envelope, or hand it directly to your loved one. They'll appreciate the time and effort you put into making something special just for them.

Greeting card (Birthday)


 Hello and we are back with an another greeting card !!

We will learn Dow to make this greeting card .

Things we need = Party streamers , giant paper sheet (any colour) , Sequences , small drawings of animals , markers , sticky notes (one page) and glue .

So let’s get started!

First page ( the main page shown in the picture):

Step 1: First ,take the giant sheet of colour paper glue a white sheet of paper on it .

Step 2: Second , take some party streamers (any colour) and make straight line out of the paper and glue it the sheet .

Step 3: Third , take some paper and make flowers ,hearts and small sequences glue them on to the paper .

Step 4:Fourth, out line the white page with a black page and write happy birthday on the white paper .

Last Page:

Step 1: First, take another sheet of white paper and glue it on the paper .Next , draw some ice creams and colour them with markers.

Step 2:Second, take a sticky note and make some designs on the paper and write the main people who made this and glue the page on the page .

Step 3: Third , stick some pages of some drawings such as elephant , bee , cat and penguin. And write some thing about the the birthday .

So we are done ✅ So we hope you like it .

Thank you and Goodbye !!!!


Thursday, August 29, 2024

Cartoon Pictures

 Cartoon Characters 

Cartoon characters are everywhere, from TV shows and comic books to video games and advertisements. They're fun, lively, and full of personality, making them a favorite subject for aspiring artists. Whether you're an experienced artist looking to expand your skills or a beginner who wants to explore the world of cartoons, this guide will take you through the essential steps to draw cartoon characters. Let’s get started!

Clean Hair

Simple Steps to Keep Your Hair Clean and Beautiful! 

Maintaining clean and healthy hair is essential for both personal hygiene and appearance. Following a simple hair care routine can help keep your hair looking its best. Here’s a straightforward guide, complete with six easy steps to keep your hair clean, fresh, and styled!


Step 1: Rinse Your Hair with Water

Start by thoroughly rinsing your hair with lukewarm water. This helps to remove initial dirt, dust, and excess oils from your scalp and hair. Water is a natural cleanser that prepares your hair for the next steps, ensuring it’s ready for shampooing.

Step 2: Apply Soap to Your Hair

Once your hair is wet, take a small amount of shampoo or soap and apply it evenly to your scalp and hair. Gently massage your scalp with your fingertips (not nails) to create a lather. This process helps to cleanse the scalp by removing oil, dirt, and product buildup.

Step 3: Dry Your Hair

After rinsing out the shampoo, gently squeeze the excess water from your hair. You can then use a soft towel to pat your hair dry. Be sure not to rub your hair harshly, as this can cause breakage and frizz. Let your hair air dry if possible, or use a blow dryer on a cool setting to speed up the drying process.

Step 4: Comb Your Hair

Use a wide-toothed comb or a brush with soft bristles to detangle your hair. Start combing from the ends and work your way up to the roots to avoid breakage and minimize damage. Regular combing helps distribute the natural oils from your scalp, which can keep your hair looking shiny and healthy.


Wednesday, August 28, 2024

Save Trees

 The Urgent Call to Save Trees

Trees are the lifeblood of our planet. They provide us with oxygen, shade, and shelter, and they are essential to the health of our ecosystems. Yet, despite their importance, trees around the world are being cut down at an alarming rate. The effects of deforestation are devastating, from the loss of biodiversity to the acceleration of climate change. It's time for all of us to step up and take action to save trees.

Why Trees Matter

  1. Oxygen and Clean Air: Trees play a crucial role in producing the oxygen we breathe. They absorb carbon dioxide—a greenhouse gas that contributes to global warming—and release oxygen through photosynthesis. A single mature tree can produce enough oxygen for four people every day. Imagine the impact if we lost millions of trees: not only would our air become less breathable, but the balance of gases in our atmosphere would also be disrupted.

  2. Climate Regulation: Trees act as natural air conditioners. They provide shade, reduce the temperature of the environment, and store carbon, helping to mitigate the effects of climate change. Deforestation, however, releases this stored carbon back into the atmosphere, contributing to global warming.

  3. Biodiversity and Habitats: Forests are home to over 80% of the world’s terrestrial species. From birds to insects, mammals to plants, countless organisms rely on trees for survival. When we cut down trees, we destroy entire ecosystems and drive species toward extinction.

  4. Water Cycle and Soil Health: Trees help maintain the water cycle by absorbing water through their roots and releasing it back into the atmosphere through transpiration. They also prevent soil erosion by anchoring the soil in place with their roots. Without trees, soil becomes dry and barren, leading to desertification and loss of fertile land.

  5. Mental and Physical Health: Green spaces filled with trees offer more than just environmental benefits—they also improve our mental and physical well-being. Studies show that spending time in nature reduces stress, anxiety, and depression, while also encouraging physical activity.

How You Can Help Save Trees

  1. Plant Trees: One of the simplest and most effective ways to combat deforestation is by planting trees. Whether in your backyard, community, or through organizations dedicated to reforestation, planting a tree is a direct action you can take to make a positive impact.

  2. Reduce Paper and Wood Consumption: Be mindful of the products you use. Opt for recycled paper, avoid unnecessary printing, and choose sustainable wood products. Every small change in consumption habits can reduce the demand for tree-derived products.

  3. Support Conservation Efforts: Many organizations are dedicated to protecting forests and fighting deforestation. By supporting these groups through donations, volunteering, or advocacy, you can contribute to the preservation of trees and the ecosystems they support.

  4. Educate and Advocate: Spread awareness about the importance of trees and the consequences of deforestation. Educate others on how they can contribute to tree conservation efforts and advocate for policies that protect our forests.

  5. Protect Local Green Spaces: Get involved in local conservation efforts to protect trees in your community. Whether it's preventing a local park from being developed or participating in tree-planting initiatives, your efforts can make a difference close to home.

The Time to Act is Now

The call to save trees is urgent. Every tree we lose brings us closer to a future where the natural world as we know it is a distant memory. But there's hope. By taking action now, we can protect and restore our forests, ensuring that future generations inherit a world filled with the beauty, wonder, and life that only trees can provide.

Join the movement to save trees today. Every tree counts, and so does every effort we make to protect them. Together, we can create a greener, healthier, and more sustainable world. 


A Journey into the Wilderness Through Art

 Deer World

Art has a unique way of transporting us to different worlds, allowing us to experience the beauty of nature and the calm it brings. Recently, I created a piece that does just that—a drawing of a majestic deer wandering through a mountainous landscape.

The process of drawing this scene was both peaceful and invigorating. The deer, standing tall and proud, symbolizes the grace and strength of nature. Its antlers, reaching towards the sky, seem to reflect its connection to the world around it, as if it's one with the towering mountains in the background.

The mountains, with their jagged peaks, represent the vast and untamed wilderness. They stretch into the sky, covered with patches of green that suggest life thriving even in the harshest environments. The rocky terrain, dotted with boulders and greenery, adds to the sense of adventure and mystery that the wilderness often brings.

This drawing is more than just a depiction of a scene—it's a reflection of the serenity that nature offers. Each stroke of the pencil and splash of color brings the wilderness to life, reminding us of the beauty that exists beyond the hustle and bustle of daily life.

Through this art, I hope to inspire others to pause and appreciate the natural world, even if it's just for a moment. Whether you're an artist or an observer, take a moment to immerse yourself in the calm and beauty that nature provides. After all, it's in these moments of reflection that we find a deeper connection to the world around us.

Feel free to share your thoughts on this drawing and how nature inspires you in your own creative journey!


Wednesday, August 21, 2024

Friend ship Day Cards

 Friend ship Day Cards

  • Origin: The concept of Friendship Day was first proposed by Joyce Hall, the founder of Hallmark cards, in 1930. However, it gained more widespread popularity when the United Nations declared July 30 as International Friendship Day in 2011.
  • Date of Celebration:
    • International Friendship Day: July 30 (recognized by the United Nations)
    • National Friendship Day (USA): First Sunday of August
    • Other Countries: The celebration date varies across different countries. For example, in India, it is often celebrated on the first Sunday of August.
  • Purpose: The day aims to promote friendship, peace, and harmony among people, communities, and countries.

The celebration typically involves friends appreciating each other through various means, such as spending time together, giving thoughtful gifts, or simply acknowledging the importance of friendship.

Plastic Pollution

Earth Pollution 

Earth pollution occurs when harmful substances or pollutants are introduced into the environment, negatively impacting natural ecosystems, wildlife, and human health. Pollution can take many forms, including air, water, soil, and noise pollution. Here’s how pollution typically happens in each of these areas:

1. Air Pollution

  • Sources: Factories, vehicles, burning fossil fuels (coal, oil, natural gas), deforestation, and agricultural activities.
  • How it Happens: Harmful gases like carbon dioxide (CO2), sulfur dioxide (SO2), nitrogen oxides (NOx), and particulate matter are released into the atmosphere. These pollutants can cause respiratory problems in humans and contribute to climate change by trapping heat in the Earth’s atmosphere (greenhouse effect).

2. Water Pollution

  • Sources: Industrial waste, agricultural runoff (pesticides and fertilizers), sewage and wastewater, oil spills, plastic waste, and chemical dumping.
  • How it Happens: Pollutants enter rivers, lakes, oceans, and groundwater systems, contaminating the water supply. This can harm aquatic life, disrupt ecosystems, and make water unsafe for drinking and recreational activities.

3. Soil Pollution

  • Sources: Agricultural chemicals (pesticides, herbicides, and fertilizers), industrial waste, mining activities, improper disposal of hazardous waste, and deforestation.
  • How it Happens: Pollutants are absorbed by the soil, leading to reduced fertility, contamination of crops, and the disruption of natural soil ecosystems. Harmful chemicals can also leach into groundwater, further spreading contamination.

4. Noise Pollution

  • Sources: Urbanization, transportation (cars, trains, planes), industrial activities, construction work, and loud entertainment.
  • How it Happens: Excessive noise can disrupt human and animal life, leading to stress, hearing loss, and disruption of communication in wildlife species.

5. Plastic Pollution

  • Sources: Improper disposal of plastic products, single-use plastics, and microplastics.
  • How it Happens: Plastic waste accumulates in the environment, especially in oceans, where it can harm marine life. Plastics break down into smaller particles (microplastics) that can enter the food chain, posing risks to wildlife and humans.

6. Chemical Pollution

  • Sources: Industrial processes, agricultural chemicals, household products (cleaners, paints), and pharmaceuticals.
  • How it Happens: Toxic chemicals are released into the air, water, and soil, leading to contamination. These chemicals can be persistent and accumulate in the environment, causing long-term damage to ecosystems and health issues in humans.

7. Light Pollution

  • Sources: Excessive or misdirected artificial lighting from cities, streetlights, and billboards.
  • How it Happens: Bright lights disrupt natural night cycles, affecting wildlife and human sleep patterns. It also obscures the visibility of stars and other celestial bodies.

Effects of Pollution:

  • Health Issues: Respiratory problems, cardiovascular diseases, cancer, and developmental issues.
  • Environmental Impact: Loss of biodiversity, habitat destruction, and disruption of ecosystems.
  • Climate Change: Increased greenhouse gas emissions contribute to global warming, extreme weather events, and rising sea levels.

Preventing Pollution:

  • Reduce Emissions: Use cleaner energy sources, reduce vehicle emissions, and promote energy efficiency.
  • Waste Management: Proper disposal and recycling of waste, reducing single-use plastics, and managing industrial waste responsibly.
  • Sustainable Practices: Adopt sustainable farming, reduce deforestation, and protect natural habitats.
  • Regulation and Policies: Governments can enforce environmental regulations and promote policies that reduce pollution.

Reducing pollution requires collective action from individuals, industries, and governments to protect the planet and ensure a healthier environment for future generation.

Elephant Drawings

 Elephant 

Step-by-Step Guide

Break down the drawing process into simple steps. 

Step 1: Draw the Basic Shapes

  • Start by drawing a large circle for the elephant's body and a smaller circle for the head. Connect them with a curved line to form the neck.
  • Add a smaller oval for the trunk's base.

Step 2: Sketch the Legs

  • Draw four thick legs using rectangular shapes. Ensure the front legs are slightly larger and thicker than the hind legs.

Step 3: Add the Trunk

  • Extend the oval from the head downward into a long, curved trunk. Keep the trunk slightly thicker near the base and taper it toward the end.

Step 4: Draw the Ears

  • Elephants have large, floppy ears. Draw two large, curved shapes on either side of the head. Make sure they extend beyond the head and towards the body.

Step 5: Outline the Head

  • Add details to the head, such as the eyes, tusks (if you’re drawing an African elephant), and the curved shape of the mouth.

Step 6: Add Details

  • Draw the tail, add details to the feet, and refine the lines for the elephant's skin folds.

Step 7: Final Touches

  • Erase any unnecessary lines and clean up your drawing. If you’re adding color, this is the time to do it.

Monday, August 19, 2024

Duck Drawings

Duck Drawings

Transportation

 Transportation Drawings For Kids

Transportation refers to the movement of people, goods, and animals from one place to another. There are several different modes of transportation, each with its unique characteristics, advantages, and disadvantages. Here’s an overview of the main types:

1. Road Transportation

  • Vehicles: Cars, trucks, buses, motorcycles, bicycles.
  • Infrastructure: Roads, highways, bridges, tunnels.
  • Advantages:
    • Flexibility and door-to-door service.
    • Suitable for short to medium distances.
    • Easily accessible and relatively low cost.
  • Disadvantages:
    • Traffic congestion.
    • Environmental pollution.
    • Road maintenance costs.

2. Rail Transportation

  • Vehicles: Trains (passenger, freight, high-speed, metro/subway).
  • Infrastructure: Railways, stations, tunnels, bridges.
  • Advantages:
    • Efficient for long distances.
    • High capacity for passengers and goods.
    • Lower environmental impact compared to road transport.
  • Disadvantages:
    • Fixed routes and schedules.
    • High infrastructure costs.
    • Less flexible than road transport.

3. Air Transportation

  • Vehicles: Airplanes, helicopters, drones.
  • Infrastructure: Airports, helipads, air traffic control systems.
  • Advantages:
    • Fastest mode of transportation for long distances.
    • Suitable for international travel.
    • High safety standards.
  • Disadvantages:
    • Expensive compared to other modes.
    • Limited cargo capacity.
    • Environmental impact (high carbon emissions).

4. Water Transportation

  • Vehicles: Ships, boats, ferries, submarines.
  • Infrastructure: Ports, harbors, canals, docks.
  • Advantages:
    • Ideal for heavy and bulky goods.
    • Energy-efficient and cost-effective for long distances.
    • Used for international trade and travel.
  • Disadvantages:
    • Slow compared to air and road transport.
    • Weather-dependent.
    • Limited to areas near water bodies.

5. Public Transportation

  • Types: Buses, trains, subways, trams, trolleys.
  • Advantages:
    • Reduces traffic congestion and pollution.
    • Cost-effective for individuals.
    • Promotes social inclusion by providing mobility for everyone.
  • Disadvantages:
    • Limited routes and schedules.
    • Overcrowding during peak hours.
    • Maintenance and operational challenges.

6. Pipeline Transportation

  • Types: Pipelines for oil, natural gas, water, sewage.
  • Infrastructure: Underground or above-ground pipelines, pumping stations.
  • Advantages:
    • Efficient and safe for transporting liquids and gases.
    • Operates continuously and requires minimal labor.
    • Less environmental impact once established.
  • Disadvantages:
    • High initial investment.
    • Potential for leaks and environmental hazards.
    • Limited to specific types of goods (e.g., liquids, gases).

7. Space Transportation

  • Vehicles: Rockets, space shuttles, space stations.
  • Infrastructure: Launch pads, spaceports, ground control.
  • Advantages:
    • Enables space exploration and satellite deployment.
    • Future potential for space tourism.
  • Disadvantages:
    • Extremely expensive and complex.
    • High risk and technical challenges.
    • Limited to very specific applications.

8. Non-Motorized Transportation

  • Types: Walking, cycling, skateboarding, horse riding.
  • Advantages:
    • Environmentally friendly.
    • Promotes health and fitness.
    • No fuel costs.
  • Disadvantages:
    • Limited speed and distance.
    • Physical effort required.
    • Safety concerns on roads.

Flower Drawings and Crafts

Drawing flowers can be a fun and creative activity. Here are the steps to draw a simple flower:

Materials Needed:

  • Pencil
  • Eraser
  • Paper
  • Colored pencils, markers, or crayons (optional)

Steps to Draw a Simple Flower:

  1. Draw the Center of the Flower:

    • Start by drawing a small circle in the middle of your paper. This circle will be the center of the flower, where the petals will radiate from.
  2. Draw the Petals:

    • Around the center circle, draw the first petal. Petals can be oval, teardrop-shaped, or any shape you prefer.
    • Continue drawing petals around the center circle. Try to make them roughly the same size and shape, evenly spaced around the center.
  3. Add More Petals:

    • For a more detailed flower, you can add a second layer of petals behind the first. These petals should be visible between the gaps of the first layer.
  4. Draw the Stem:

    • From the bottom of the center circle, draw a straight or slightly curved line downward for the stem.
  5. Add Leaves:

    • Draw leaves on either side of the stem. The leaves can be simple ovals or more detailed with a pointed tip and a vein in the middle.
  6. Detail the Flower:

    • Add details to your flower, such as small lines on the petals to represent texture or veins. You can also add a few more leaves or grass at the bottom.
  7. Color the Flower (Optional):

    • If you want, you can color your flower using colored pencils, markers, or crayons. You can choose any colors you like, or try to match the colors of a real flower.
  8. Add Shadows and Highlights (Optional):

    • To give your flower a more realistic look, you can add shading to the petals and leaves by lightly shading one side with your pencil. You can also add highlights by leaving certain areas lighter.

Wednesday, May 1, 2024

Wall Decor

 Wall Decor

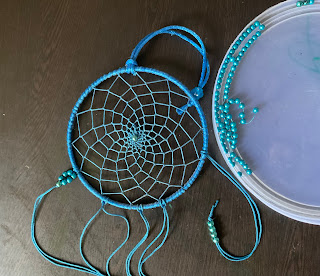
.Beautiful wall decor made with beads , feathers, blue thread, skeleton leaves, paint

  1. Wrapping the hoop. Using the 1 ply hemp, start by securing the end of the hemp to your hoop with a double knot. Wrap the hemp around the hoop by picking up the ball from the center of the hoop and bringing it up and around to the back
  2. Weaving the center web.
  3. Create the web by weaving  along the frame of the hoop, starting from the outside and working inwards.
  4. Boil the two cups of water
  5.  Remove the water from heat, add the leaves, and let them soak for 20 to 30 minutes. Once they are done soaking, scrape the pulp off like your normally would.
  6. Decorating with beads ,feathers leaves, glitters
  7. If you'd like you can add some beads to the center before finishing off.


Saturday, January 27, 2024

Parrots world

 Parrot’s world 

Parrots are one of the most intelligent birds on the earth . They eat small grains like rice , fruits ans vegetables. Parrots are also originated from the Tropics , And the most important ….. Parrots come various different colours !

The most common colours of the parrot are green and red . But , they are parrots that have different colours like Parakeet , Blue-Fronted Amazon , Lovebirds and Cockatoos etc.

As you can they are many parrots with various different species , With various different qualities like colour etc. They are not only green and red which is the common .

In this post we should learn how to draw different types of parrots drawings , kids also try this drawings easy to understand.